How to cook Sushi rice, also referred to as Japanese rice or japonica rice, is a short- or medium-grain white rice that has been prepared with a sweet-tangy vinegar dressing. This rice is a fundamental ingredient used to make various types of sushi. When cooked properly, sushi rice has a bright, glossy appearance and sticks together to bind ingredients like fish, vegetables, and seafood. The sweet yet acidic flavor profile also perfectly complements raw seafood.
There are a few key characteristics that set great sushi rice apart:
- Short, plump grains that cling together when shaped
- A balance of sweet and sour flavor
- A tender, toothsome texture with a slight chew
Achieving these criteria for exemplary sushi rice relies on selecting the right rice variety, using the appropriate cooking method, and flavoring rice with seasoned vinegar while hot. Let’s break down exactly what’s entailed in the art of crafting phenomenal sushi rice.
Savoring the Craft: how to cook sushi rice on stove
Cooking sushi rice on the stove is a straightforward process that yields the perfect foundation for delicious sushi creations. To begin, measure the desired amount of short-grain or Japanese-style rice and rinse it thoroughly under cold water to remove excess starch. In a saucepan, combine the rinsed rice with the appropriate amount of water, typically using a 1:1 ratio. Allow the rice to soak for about 30 minutes to ensure even cooking.
Once soaked, bring the rice to a boil over medium-high heat. After reaching a boil, reduce the heat to low, cover the saucepan with a tight-fitting lid, and let it simmer for 15-20 minutes. This slow, gentle cooking process ensures that the rice cooks evenly and achieves the desired sticky texture.
After the allotted time, remove the saucepan from the heat and let it sit, covered, for an additional 10 minutes. This resting period allows the rice to finish absorbing any remaining moisture and enhances its fluffiness. Finally, use a wooden or plastic rice paddle to gently fluff the rice and let it cool slightly before using it in your favorite sushi recipes.
By following these steps, you can easily prepare sushi rice on the stove, providing the perfect base for your homemade sushi rolls, nigiri, or any other sushi creations you have in mind.
Instant Perfection: Crafting Sushi Rice with Ease in the Instant Pot
Cooking sushi rice in an Instant Pot offers a convenient and efficient method, producing consistently delicious results. Begin by rinsing the desired amount of short-grain or Japanese-style rice under cold water to remove excess starch. In the Instant Pot, combine the rinsed rice with an equal amount of water, maintaining the 1:1 ratio commonly used for sushi rice.
Allow the rice to soak for approximately 30 minutes, promoting even water absorption. Once soaked, seal the Instant Pot, set it to the “Pressure Cook” mode, and select a cooking time of 4-5 minutes. The Instant Pot will build pressure, and the rice will cook to perfection.
Once the cooking cycle is complete, allow the Instant Pot to release pressure naturally for about 10 minutes before using the quick-release valve for the remaining pressure. Carefully open the lid, fluff the rice with a wooden or plastic rice paddle, and let it cool slightly.
This hassle-free approach to cooking sushi rice in an Instant Pot not only saves time but also ensures a consistently delightful texture, providing a fantastic foundation for your homemade sushi creations.
Traditional Mastery: Cooking Perfect Sushi Rice in a Pot
Cooking sushi rice in a traditional pot is a straightforward and accessible method that results in a perfect foundation for your sushi dishes. Begin by measuring the desired amount of short-grain or Japanese-style rice and thoroughly rinsing it under cold water to remove excess starch. In a pot, combine the rinsed rice with an equal amount of water, maintaining the 1:1 ratio commonly recommended for sushi rice.
Allow the rice to soak for approximately 30 minutes, ensuring that the grains absorb water evenly. After soaking, bring the rice to a boil over medium-high heat. Once boiling, reduce the heat to low, cover the pot with a tight-fitting lid, and let it simmer for 15-20 minutes. This gentle cooking process ensures that the rice achieves the desired sticky texture.
After the simmering period, remove the pot from the heat and let it sit, covered, for an additional 10 minutes. This resting period allows the rice to absorb any remaining moisture and enhances its fluffiness. Finally, use a wooden or plastic rice paddle to gently fluff the rice, letting it cool slightly before incorporating it into your sushi creations.
Cooking sushi rice in a pot provides a traditional and reliable method, offering a versatile base for homemade sushi rolls, nigiri, and various other sushi delights.
Mastering the Basics: Cooking Exceptional Sushi Rice Without a Rice Cooker
Cooking sushi rice without a rice cooker is entirely achievable, bringing the art of traditional preparation to your kitchen. Begin by measuring the desired amount of short-grain or Japanese-style rice and rinsing it thoroughly under cold water to remove excess starch. In a pot, combine the rinsed rice with an equal amount of water, maintaining the 1:1 ratio typically used for sushi rice.
Allow the rice to soak for about 30 minutes to ensure even water absorption. After soaking, bring the rice to a boil over medium-high heat. Once it reaches a boil, reduce the heat to low, cover the pot with a tight-fitting lid, and let it simmer for 15-20 minutes. This careful simmering process ensures that the rice achieves the desired sticky texture.
After the simmering time, remove the pot from the heat and let it sit, covered, for an additional 10 minutes. This resting period allows the rice to absorb any remaining moisture, enhancing its fluffiness. Use a wooden or plastic rice paddle to gently fluff the rice, letting it cool slightly before incorporating it into your sushi creations.
Cooking sushi rice without a rice cooker provides a hands-on and traditional approach, yielding a versatile base for crafting homemade sushi rolls, nigiri, and a variety of other delightful sushi dishes.
Effortless Excellence: how to cook sushi rice in a pot
Cooking sushi rice in an Instant Pot is a quick and efficient method, ensuring consistent and delicious results. Begin by measuring the desired amount of short-grain or Japanese-style rice and rinsing it thoroughly under cold water to remove excess starch. In the Instant Pot, combine the rinsed rice with an equal amount of water, maintaining the 1:1 ratio commonly used for sushi rice.
Allow the rice to soak for approximately 30 minutes, promoting even water absorption. Once soaked, seal the Instant Pot, set it to the “Pressure Cook” mode, and select a cooking time of 4-5 minutes. The Instant Pot will build pressure, and the rice will cook to perfection.
After the cooking cycle is complete, allow the Instant Pot to release pressure naturally for about 10 minutes before using the quick-release valve for the remaining pressure. Carefully open the lid, fluff the rice with a wooden or plastic rice paddle, and let it cool slightly.
This straightforward method of cooking sushi rice in an Instant Pot not only saves time but also ensures consistently delightful texture, providing an excellent foundation for your homemade sushi creations.
Effortless Excellence: how to cook sushi rice in a rice cooker
Cooking sushi rice in a rice cooker simplifies the process, ensuring a consistent and perfectly cooked foundation for your sushi creations. Start by measuring the desired amount of short-grain or Japanese-style rice and rinsing it thoroughly under cold water to remove excess starch. Transfer the rinsed rice to the rice cooker and add the appropriate amount of water, usually following a 1:1 ratio.
Once everything is in the rice cooker, let it sit for about 30 minutes to allow the rice to absorb water evenly. After the soaking period, turn on the rice cooker and let it work its magic. Most rice cookers have a built-in sensor to determine when the rice is cooked, automatically switching to a “keep warm” mode.
Once the rice cooker indicates that it’s done, let the rice sit for an additional 10-15 minutes to allow it to settle and firm up. Afterward, use a wooden or plastic rice paddle to fluff the rice gently, allowing it to cool slightly before incorporating it into your sushi rolls, nigiri, or other delightful creations.
By utilizing a rice cooker, you not only streamline the cooking process but also ensure a consistent and perfectly cooked sushi rice that forms the basis for a delightful sushi experience.
Mastering the Art of Sushi Rice: A Comprehensive Guide to Recipes, Techniques, and Seasonings
In crafting the perfect sushi experience, it’s essential to master the art of Sushi Rice. A stellar recipe for Sushi Rice is crucial, and you can achieve this by following the guidelines for Homemade Sushi Rice, ensuring it reaches perfection. The choice of rice is pivotal, with Short-Grain Japanese Rice being a preferred option for its sticky texture, providing the ideal foundation for your sushi creations.
When delving into the realm of Homemade Sushi, diversify your skills by exploring various sushi styles such as Sushi Rolls and Nigiri. Additionally, pay attention to Sushi Rice Seasonings to elevate the flavor profile of your creations. Japanese Rice, particularly glutinous varieties, stands out as the best choice for sushi-making, contributing to the authentic and delightful texture that sushi enthusiasts appreciate.
The incorporation of Rice Vinegar is a classic technique, forming the basis of the Vinegar Mixture that defines traditional sushi rice. To add a unique twist, consider alternatives like Toasted Sesame Oil as a substitution for Vegetable Oil, introducing a distinctive flavor to your sushi dishes.
As you embark on your sushi-making journey, explore the realm of seasonings. Experiment with Simple Seasonings like Rice Vinegar, White Sugar, and Salt, understanding how these elements harmonize to create the perfect balance of flavors. Embrace Short-Grain rice varieties for sushi-making, recognizing their compatibility with the art form.
In the process of Seasoning Sushi Rice, focus on the traditional approach encapsulated in a Classic Sushi Rice recipe, ensuring the Vinegar Mixture imparts a nuanced and authentic taste. For those seeking alternatives, explore the versatility of ingredients such as Vegetable Oil and its substitutes like Toasted Sesame Oil.
Mastering Sushi Craftsmanship: A Comprehensive Exploration of Ingredients, Techniques, and Flavors
Exploring the world of sushi preparation involves mastering various elements to create a culinary masterpiece. To perfect the art of sushi rice, focus on achieving the ideal texture with options like sticky rice, short-grain rice, or incorporating them into vibrant poke bowls. When it comes to the cooking process, consider different methods such as using an Instant Pot, a traditional stovetop, or a pressure cooker, each offering its unique advantages.
Delving further into sushi varieties, maki rolls, along with other favorites like poke bowls and onigiri, add diversity to your repertoire. Enhance the flavors by incorporating key elements like vinegar, experimenting with rice vinegar, unseasoned rice vinegar, and sugar to achieve the desired taste profile.
The choice of rice is pivotal, with short-grain rice and Japanese-style rice serving as excellent foundations for sushi creations. Explore the convenience of a rice cooker for achieving the perfect texture in your rice or experiment with sticky rice for a unique twist. Additionally, the incorporation of umami flavors through ingredients like kombu, seaweed, and sushi vinegar elevates the taste experience.
In the traditional sushi-making process, aspects like rice-folding play a role, with tools such as a rice paddle, wooden hangiri, and adherence to traditional methods contributing to the authenticity of the dish. Seasoning the rice is an art in itself, utilizing components like unseasoned rice vinegar, sugar, and salt, while achieving polished, shiny rice with individual grains adds to the visual and textural appeal of your sushi creations.
What’s the Best Rice For Sushi?
Not all rice varieties work well for sushi. Using long-grain white rice like jasmine and basmati does not yield rice with the proper sticky texture required to hold sushi rolls together.
The two best rice options for sushi include:
Japanese Short Grain Rice
Sometimes labeled as japonica, Japanese short-grain rice represents the gold standard for sushi. Grains are soft and stick together when cooked while retaining a subtle chew. This variety works beautifully to bind nigiri sushi, maki rolls, and hand rolls without getting overly gummy. Brands like Kokuho Rose and Nishiki deliver reliable Japanese rice quality.
Calrose Rice
Developed specifically for the Californian market from Japanese rice strains, Calrose rice has medium-length grains that provide excellent consistency for sushi rice. The grains are soft and cling together when shaped and rolled while keeping an appealing bite. Calrose is cheaper and easier to source than imported Japanese rice, making it a top pick for many sushi chefs.
Both Japanese and Calrose rice offer plump, almost round grains that ooze starch. This starchy quality allows the grains to bind together into that quintessential sweet-tangy sushi rice so beloved around the world!
How to Make Sushi Rice
Now that you know which rice varieties work best, let’s get into the nitty-gritty of actually preparing superb sushi rice…
Allrecipes Community Tips and Praise
*”I found that adding a teaspoon of rice vinegar per cup of uncooked rice gives it the flavor of restaurant quality sushi rice.” – Kimmie
- “Placing a clean, damp cloth over the top of the finished rice while cooling helped with texture.” – Maggie
Ingredients
- 2 cups uncooked short-grain Japanese or Calrose rice
- 2 1⁄4 cups water
- 1⁄4 cup rice vinegar
- 2 tablespoons white sugar
- 1 1⁄2 teaspoons salt
Directions
- Rinse rice in a fine mesh strainer until water runs clear. Drain well.
- Add rinsed rice and 2 1⁄4 cups water to the rice cooker. Or combine in a medium saucepan if cooking on the stovetop.
- Cook rice according to appliance directions. Do not stir the rice as it cooks. If boiling on stovetop, cover, reduce heat to low, and simmer for 15-20 minutes until tender.
- Transfer freshly cooked hot rice to a large wooden or glass mixing bowl. Do not use metal which affects flavor. Gently stir rice with a wooden paddle or spatula to help release excess moisture and separate any clumped grains.
- In a small bowl, stir together vinegar, sugar, and salt until dissolved. Slowly drizzle the vinegar mixture over hot rice while gently folding using a slicing motion to distribute evenly. Do not smash grains.
- Allow seasoned sushi rice to cool uncovered to room temperature before using, about 30 minutes. Fluff grains gently with a fan or paper to hasten cooling.
- Cover tightly and refrigerate if not using immediately. Keeps up to 5 days chilled.
POSSIBLE VARIATIONS:
- Stir in some sake, mirin rice wine, or Japanese beer for extra flavor depth
- Fold in thin omelet egg strips or furikake dry seasoning blend just before serving
- Mix in finely diced avocado or cucumber for built-in veggie rice
WAYS TO USE SUSHI RICE:
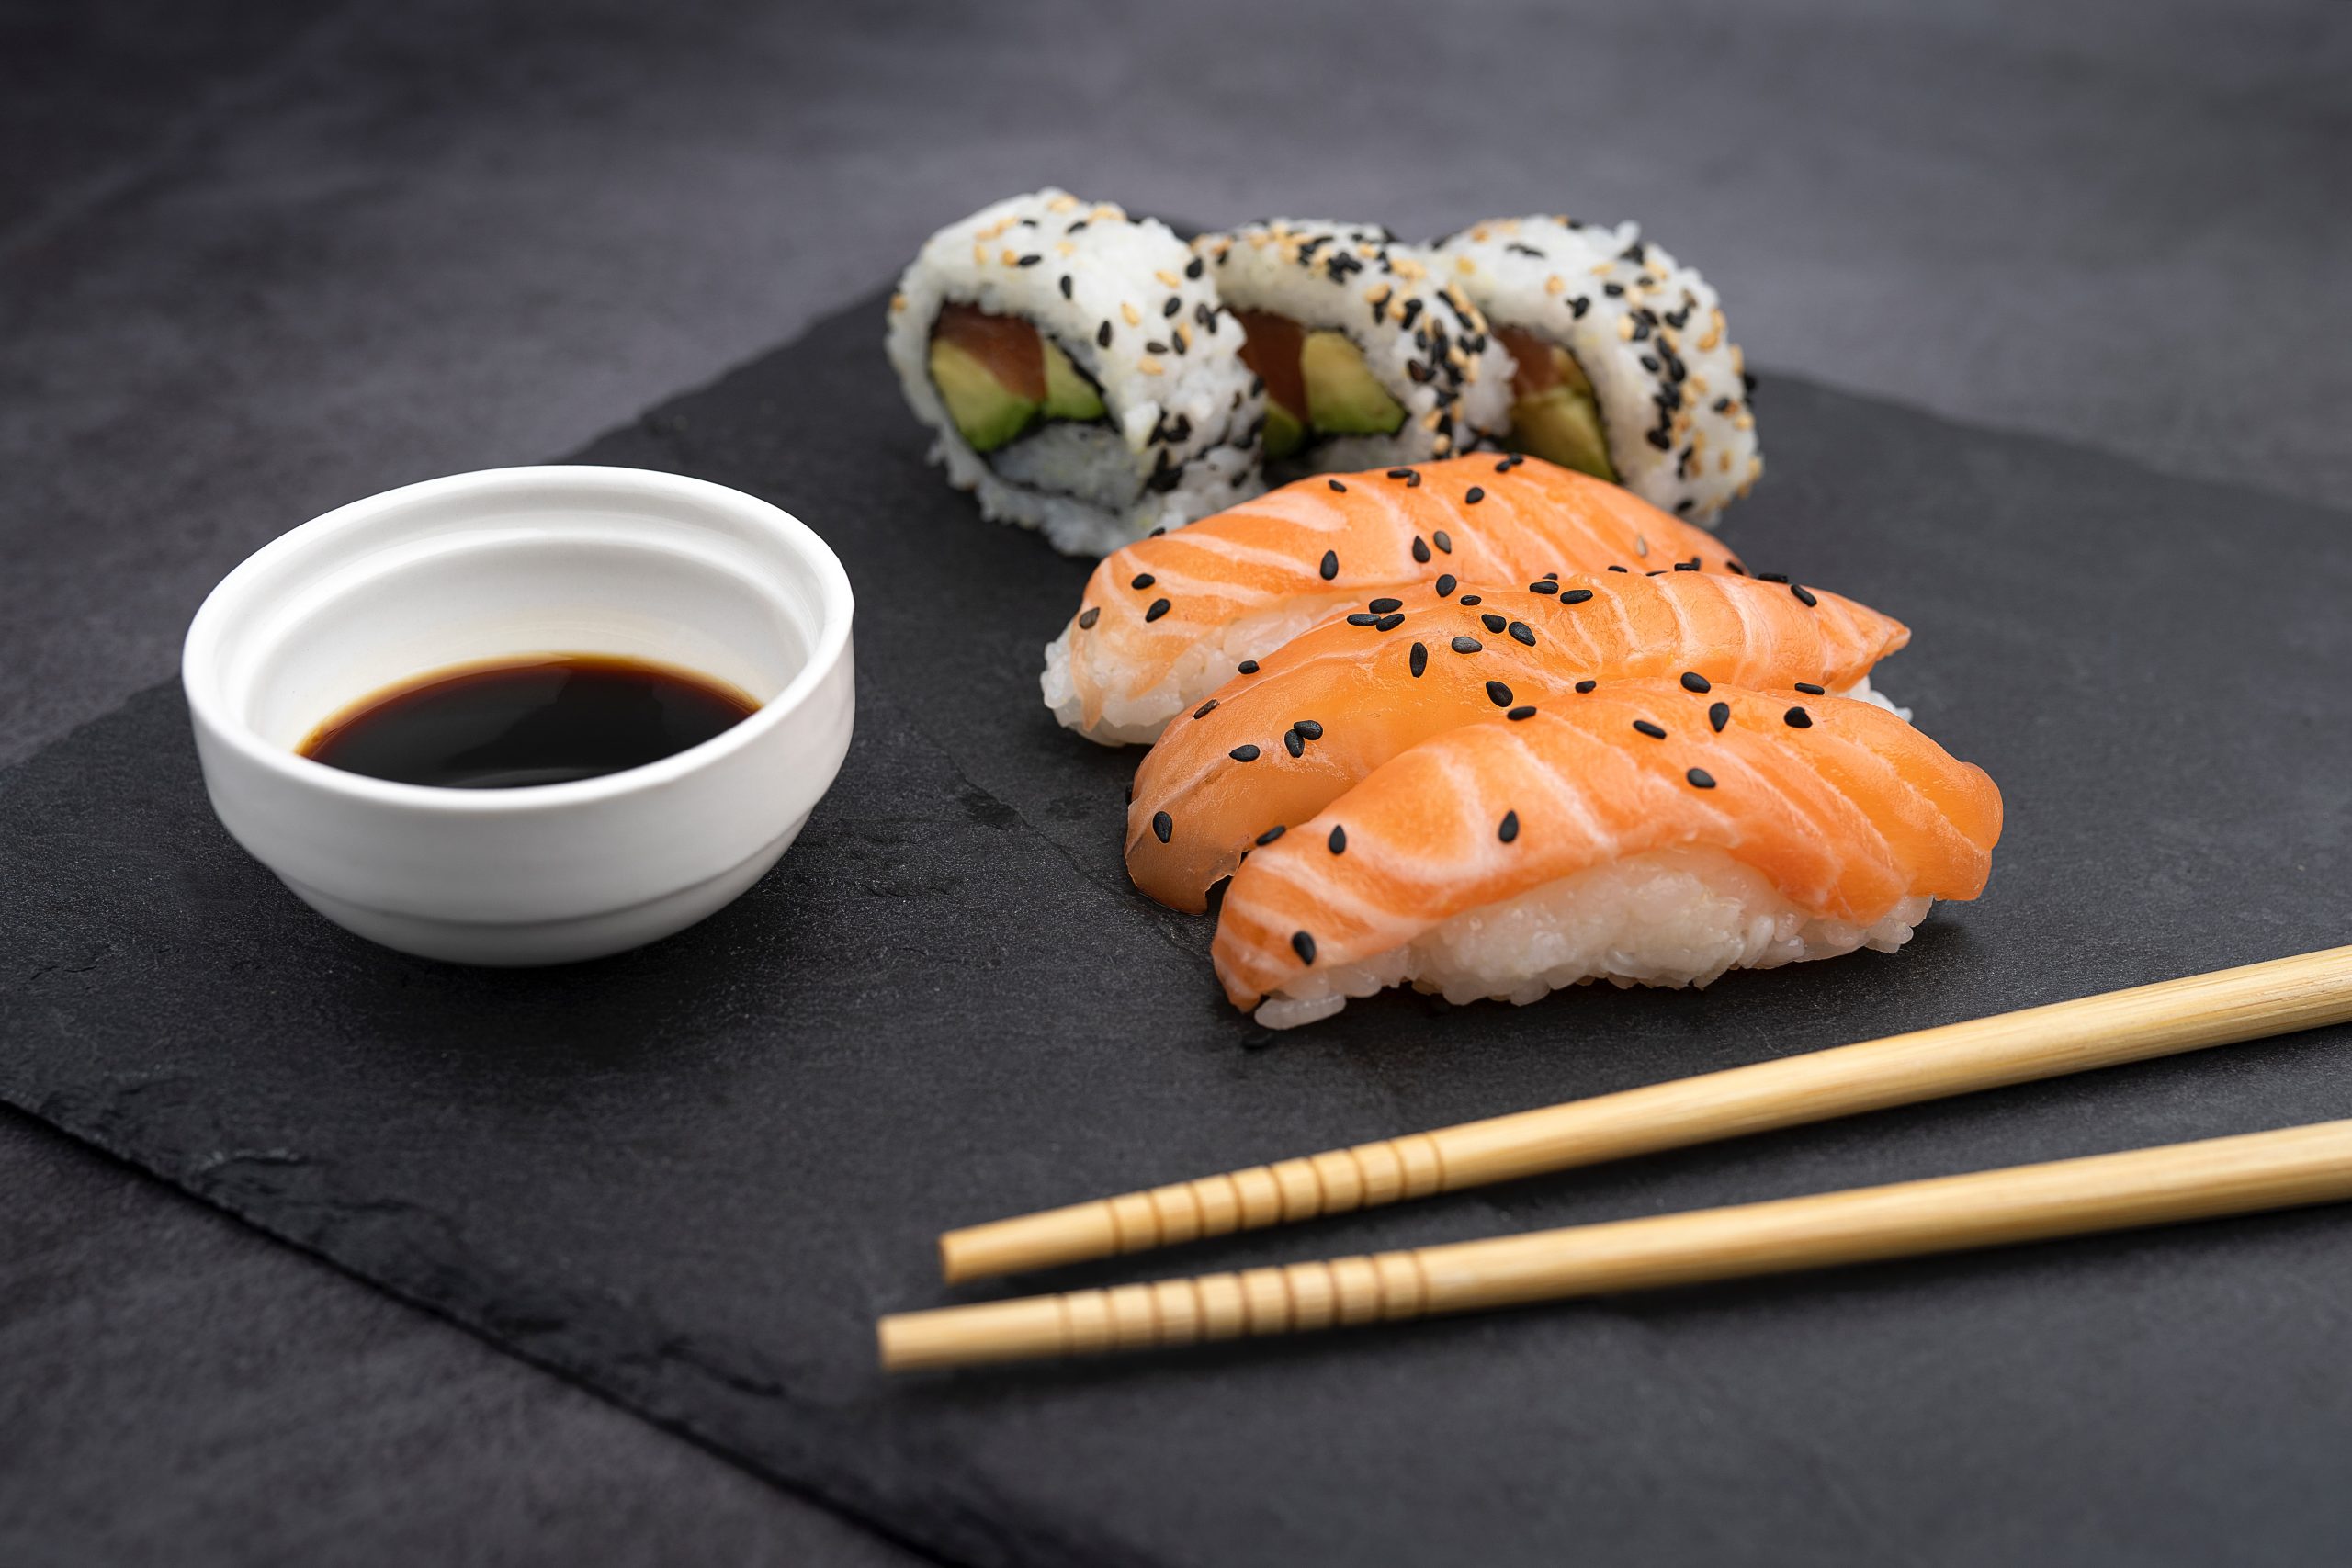
- Pressed sushi (nigiri with fish or shrimp atop rice blocks)
- Rolled sushi (maki stuffed with fillings)
- Hand-rolled cones (temaki filled with avocado, tuna, etc.)
- Sushi bowls (rice topped with raw fish or poke)
- Stir fries (rice sautéed with meat and vegetables)
Conclusion:
As demonstrated throughout this extensive sushi rice preparation guide, every step matters for producing exemplary texture and taste. Start with premium Japanese short grain or Calrose medium grain rice for the proper balance of stickiness and integrity when rolled. Wash and optionally soak rice before simmering cooked via a rice cooker or saucepan using the suggested rice-to-water ratios. Steam and absorb water completely before immediately seasoning hot rice with sweetened vinegar. This allows rice to absorb maximum flavor while cooling. Finally, let rice rest uncovered for the ideal sticky gloss before forming sushi or refrigerate for later use.
Follow this process precisely for crafting flawless sushi rice worthy of any top sushi bar! Whether you wish to prepare nigiri, maki rolls, temaki hand rolls, or poke bowls, incredible homemade sushi rice sets the foundation. Sushi rice mastery relies on quality ingredients, the right technique, temperature control, and a little patience. So break out your rolling mats and get ready to start producing restaurant-caliber sushi rice creations in your kitchen!
Answer these FAQS:
Does soaking the rice make a difference?
Yes, soaking short-grain sushi rice for 30-60 minutes before cooking can help enhance moisture content and allow more flavor absorption into the grains. Soaking is optional but often results in ideal tender rice.
What’s the appropriate rice-to-water ratio?
The ideal water amount varies based on the cooking method. For the stovetop, use a 1:1 rice-to-water ratio. For rice cookers, do a 1:1.1 ratio (slightly more water). Fuzzy logic cookers can handle more water since they regulate temperature and moisture.
Is a rice cooker necessary or can I use a pot?
You absolutely can make great sushi rice on the stovetop in a heavy pot or saucepan using the absorption method. Just ensure the pan has a tight-fitting lid for steaming. Rice cookers provide more convenience but are not essential.
Can I use brown rice instead?
Technically yes, but brown rice lacks the plump, sticky texture perfect for shaping nigiri and rolling maki. The bran layer on whole-grain brown rice causes drier, firmer grains. Stick to white short-grain rice varieties for traditional sushi texture.
Is it okay to refrigerate and reheat rice?
Yes, leftover sushi rice keeps covered in the fridge for about 5-6 days. The texture declines a bit over time but remains decent for rolls. Gently reheat refrigerated rice with a splash of rice vinegar and sugar to restore flavor and moisture.
Do I need special equipment?
Not at all. Useful tools include a wooden rice paddle or spatula for gentle folding, a non-metallic mixing bowl, a mesh strainer for rinsing, a fan or paper for air circulation while cooling, a wooden sushi rolling mat, and a tight sealing container for storage. No fancy appliances are needed!
What if my rice turns out too sticky?
Using too much water or over-handling the grains can cause gummy sushi rice. To fix, gently fold in a tiny bit of rice flour or cornstarch before using it to absorb excess moisture and loosen the texture back up.
How long does it keep after made?
Properly stored sushi rice stays fresh in an airtight container in the fridge for 5-6 days. Over time, the vinegar flavor dissipates so you may need to add a little more before using. You can also freeze rice for 1-2 months.
What sake and mirin should I use?
Honjozo-shu grade sake and aji-mirin-containing alcohol work best, as they lend subtle sweetness without overpowering vinegar flavor. Very dry sakes and non-alcoholic mirin do not infuse as much flavor.
Is sushi rice gluten-free?
Plain rice is inherently gluten-free. However, some rice vinegar contains trace gluten from the brewing process. Opt for brands that explicitly state “gluten-free” on labels to be safe for celiac disease and sensitivity.
How to Cook Sushi Rice:
- Rinse: Begin by rinsing short-grain or Japanese-style rice thoroughly under cold water to remove excess starch.
- Soak: Combine the rinsed rice with an equal amount of water, following the common 1:1 ratio. Allow the rice to soak for approximately 30 minutes, ensuring even water absorption.
How to Cook Sushi Rice on Stove:
- Boil: After soaking, bring the rice to a boil over medium-high heat in a pot.
- Simmer: Reduce the heat to low, cover the pot with a tight-fitting lid, and let it simmer for 15-20 minutes.
- Rest and Fluff: Remove the pot from heat and let the rice sit, covered, for an additional 10 minutes. Gently fluff the rice with a rice paddle before use.
How to Cook Sushi Rice in Rice Cooker:
- Combine: Rinse the rice and add an equal amount of water (1:1 ratio) in the rice cooker.
- Soak: Allow the rice to soak for 30 minutes.
- Cook: Turn on the rice cooker and let it complete the cooking cycle.
- Rest and Fluff: Allow the rice to sit for 10-15 minutes before gently fluffing it with a rice paddle.
These steps guide you through the process of cooking sushi rice, whether on the stove or using a rice cooker, ensuring a perfect foundation for your sushi creations.
How Long to Cook Sushi Rice:
Sushi rice typically takes 15-20 minutes to cook. This time frame applies whether you’re cooking it on the stove or using a rice cooker. The key is to achieve a tender yet slightly sticky texture.
How Long Does Sushi Rice Take to Cook:
In an Instant Pot, sushi rice can be cooked in 4-5 minutes under pressure. Additional time is needed for the natural release of pressure, contributing to the overall cooking process.
How to Cook Rice for Sushi:
- Rinse: Begin by thoroughly rinsing short-grain or Japanese-style rice under cold water. This step removes excess starch.
- Soak: Combine the rinsed rice with an equal amount of water (1:1 ratio). Allow it to soak for approximately 30 minutes to promote even water absorption.
- Cooking Method: Choose your preferred method, whether on the stove, in a rice cooker, or using an Instant Pot, and follow the specific instructions for each.
How to Cook Sushi Rice in Instant Pot:
- Rinse and Soak: Rinse the rice and combine it with an equal amount of water (1:1 ratio). Soak for 30 minutes.
- Instant Pot Setting: Set the Instant Pot to “Pressure Cook” for 4-5 minutes.
- Natural Release: Allow the Instant Pot to release pressure naturally for about 10 minutes.
- Fluff and Cool: Gently fluff the rice with a rice paddle and let it cool slightly before using.
How to Cook Sushi Rice on the Stove:
- Rinse: Thoroughly rinse short-grain or Japanese-style rice under cold water.
- Soak: Combine rice with an equal amount of water (1:1 ratio) and soak for 30 minutes.
- Boil: Bring rice to a boil, then reduce heat, cover, and simmer for 15-20 minutes.
- Rest and Fluff: Allow rice to rest, covered, for an additional 10 minutes. Gently fluff with a rice paddle before using.
How to Cook Sushi Rice in the Microwave:
Cooking sushi rice in the microwave is not recommended, as it may result in uneven cooking and affect the desired texture. Traditional methods like stove-top or rice cookers are preferable.
How to Cook Sushi Rice in the Instant Pot:
- Rinse and Soak: Rinse rice and combine with equal water (1:1 ratio). Soak for 30 minutes.
- Instant Pot Setting: Set Instant Pot to “Pressure Cook” for 4-5 minutes.
- Natural Release: Allow for natural pressure release for about 10 minutes.
- Fluff and Cool: Gently fluff rice with a paddle and let it cool slightly before using.
How to Cook Sushi Rice in a Pressure Cooker:
- Rinse and Soak: Rinse rice and combine with equal water (1:1 ratio). Soak for 30 minutes.
- Pressure Cooker Setting: Set the pressure cooker to cook for 4-5 minutes.
- Natural Release: Allow for natural pressure release for about 10 minutes.
- Fluff and Cool: Gently fluff rice with a paddle and let it cool slightly before using.
How to Cook Sushi Rice on Stovetop:
- Rinse: Thoroughly rinse short-grain or Japanese-style rice under cold water.
- Soak: Combine rice with an equal amount of water (1:1 ratio) and soak for 30 minutes.
- Boil: Bring rice to a boil, then reduce heat, cover, and simmer for 15-20 minutes.
- Rest and Fluff: Allow rice to rest, covered, for an additional 10 minutes. Gently fluff with a rice paddle before using.
How to Cook Sushi Rice for Onigiri:
- Rinse and Soak: Rinse rice and combine it with an equal amount of water (1:1 ratio). Soak for 30 minutes.
- Cook: Follow the stovetop or rice cooker method mentioned above.
- Season: Once cooked, season the rice with a mixture of rice vinegar, sugar, and salt.
- Cool: Allow the rice to cool slightly before shaping it into onigiri.
What Is the Water Ratio for Sushi Rice?
The water ratio for sushi rice is typically 1:1, meaning an equal amount of water to rice. This ratio ensures the rice achieves the desired texture and stickiness, ideal for sushi preparations.
These guidelines provide a step-by-step approach to cooking sushi rice on the stovetop and specifically for onigiri, addressing common questions about water ratios.
Can You Cook Sushi Rice Like Regular Rice?
Yes, you can cook sushi rice like regular rice, but the crucial aspect is using the appropriate water-to-rice ratio and ensuring proper soaking. Sushi rice is typically short-grain or Japanese-style rice and the unique texture and stickiness are achieved through specific cooking and preparation steps.
Do You Need Rice Vinegar for Sushi?
Yes, rice vinegar is an essential ingredient for sushi. It adds a distinct flavor to the rice and contributes to the overall taste experience. The seasoned rice vinegar mixture is crucial for achieving the authentic taste and texture of sushi rice.
Do I Need to Soak Sushi Rice?
Yes, soaking sushi rice is a crucial step in the preparation process. Soaking allows the rice to absorb water evenly, promoting a consistent texture and ensuring that it cooks uniformly. This step is essential for achieving the desired sticky and slightly chewy quality of sushi rice.
How Long Should Sushi Rice Soak For?
Sushi rice should soak for approximately 30 minutes. This soaking period enhances the rice’s ability to absorb water evenly, contributing to the ideal texture for sushi.
What Happens If You Don’t Soak Sushi Rice?
Skipping the soaking step may result in uneven water absorption during cooking, leading to inconsistencies in the texture of the rice. Soaking is essential for achieving the desired stickiness and firmness in sushi rice.